Using PYME Acquire
User interface
The PYME graphical user interface (GUI) is shown below.
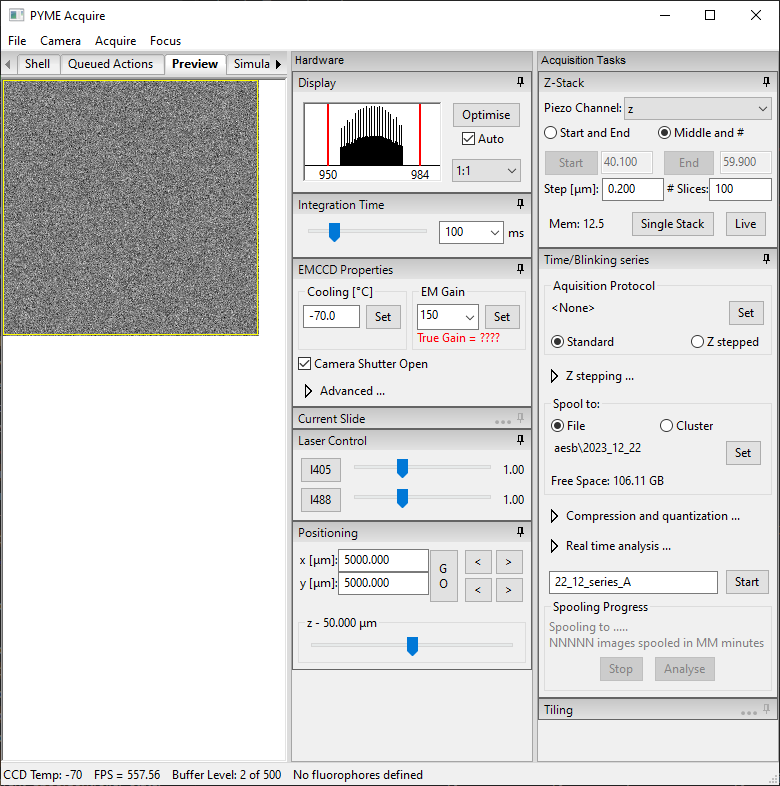
The GUI is divided into a live-preview window (left) and two vertical control panels (right) for hardware controls and acquisition task controls. The console (for programmatic access) is available in the Shell tab on the left. The left side of the GUI can be split to view multiple tabs simultaneously by clicking-and-dragging on the tabs. The hardware and acquisition panel sections can be folded or pinned-open by clicking the title bar or pin icon, respectively. The sections which appear in these panels are controlled by the initialization file (see Configuring PYME Acquire). The acquisition task panel includes a Z-Stack section for single z-stack acquisition, and a Time/Blinking section for streaming data to disk (or server) and using acquisition protocols (see Streaming/Spooling).
The camera & preview
PYMEAquire will start with the camera running in a continuous live preview mode. The mapping of the (high bit depth) camera data to the display is controlled by the display widget. By default this auto-scales the available dynamic range (max value - min value) in the image to 8 bits for display. This auto-scaling behaviour can be disabled by unchecking the Auto option. When auto-scaling is disabled, the scaling can be adjusted by dragging the red reference lines on the histogram, right-clicking to edit the range as text, or by clicking Optimise to achieve a min-max scaling once for the current frame. For historical reasons this display assumes a maximum camera dynamic range of 12 bits and with cameras possesing a higher dynamic range it is possible to saturate the display before the camera saturates. The display widget also allows the display magnification to be changed.
Integration time
The camera integration (exposure) time can be set using the integration time slider or the accompanying combobox.
Region of interest
A region of interest can be selected by using the mouse to select an area in the preview window and then selecting from the menu, or by using the ascociated keyboard shortcut (F8). The ROI can then be cleared through the menu, or by pressing F8 again.
Advanced camera properties
Some cameras (eg the Andor EMCCDs) will cause an additional pane of advanced settings to be shown which allow, for example, the EM gain end TE cooling temperature to be set. A not completely obvious aspect of the acquisition software is that it will run the camera in continuous mode (ie letting the camera acquire frames one after the other and stream them into a buffer). This has the advantage of allowing the higest possible frame rates, but means that the camera frames and any hardware actions are essentially asynchronous. If syncronised motion is required, the camera can be placed into single shot mode whereby control returns to the software after each frame. For the Andor camera, this is achieved in the Advanced section of the EMCCD controls. This is probably advisable when doing, for example, conventional single z-stacks. Z-stacks in protocols avoid the syncronisation problem by recording a timestamp of when the movement occured and calculating, post-hoc, which frame it corresponds to.
Multiple camera support
PYMEAcquire has some basic support for multiple cameras. If multiple cameras are
defined in the initialisation file, a control will be shown permitting switching
between the cameras.
For simultaneous multi-camera operation, such as using additional cameras for
focus-locking or detecting additional color channels, multiple instances of
PYMEAcquire can be run using separate initialization files. Synchronization
can then be achieved using server interfaces
(see PYME.Acquire.acquire_server.AcquireHTTPServer).
Please feel free to get in touch for support in setting this up for your application.
Acquiring data
Acquiring single images
Single images (snapshots) may be acquired by either selecting
or by pressing F5. These can be saved as .tif, .h5, and other formats (see PYME Data Formats).
Single Z-Stacks
3D image stacks such as used for conventional widefield microscopy and, for example
PSF measurements can be obtained using the control at top right. Again, the options are .tif, .h5, and other formats (see PYME Data Formats).
Streaming/Spooling
The Time/Blinking section of the acquisition panel contains controls for acquiring image series. An acquisition protocol can be selected by pressing Set to follow a pre-defined acquisition sequence, while acquisition without a protocol selected will simply start saving camera frames (leaving laser shutters and other settings in their current state). Selection of Standard or Z stepped buttons determines whether the focus position should be stepped during the acquisition. The Z stepping… expandable arrow exposes controls for setting the z-stepping range and step-size.
The Spool to: section displays the directory image series will be saved to, which
can be changed by clicking Set.
Series can be saved directly to disk in .h5 format by selecting File, or streamed
to a (local) server process by selecting Cluster.
While spooling to file is the most straightforward, spooling to the cluster
can enable significantly higher frame rates and lower-latency real-time analysis.
Spooling to the cluster requires that the PYMECluster server is running.
Cluster spooling will save the image series either as a single .h5 file
(Spool to h5 on cluster checkbox selected) or as a directory of .pzf PYME zip format files (one file per frame).
Spooling to a single h5 format is typically more convenient when running the cluster locally (‘cluster of one’)
on the same computer as PYMEAcquire, while spooling to .pzf files is the higher bandwidth option
when running a cluster copmrised of several computers.
Note that when spooling to cluster, the data will be saved under the dataserver root directory (see the PYME.config module).
Compression is enabled by default, and is compatible with either spooling mode (file or cluster). The default compression is loss-less, meaning the data is not altered but the file size is reduced. The Quantization checkbox toggles whether the camera counts (ADUs) are re-quantized using a square-root scaling before compression - this option is lossy! Given that cameras digitize pixel intensity voltages using a linear scaling, but Poisson noise scales with the square-root of the intensity, this ‘quantized’ compression can significantly reduce the number of unique values present in an image, significantly improving the compression factor without having a practical effect on the information content. This quantized compression is described in more detail here (preprint), and requires camera noise properties to be present in the metadata. The Quantization scale factor is in units of expected Poisson noise (standard deviation) at each pixel (Scale factors below 1 therefore result in pixel intensity changes below the noise floor). The Quantization offset should typically be left as ‘auto’ which will subtract the analog-digital offset before re-quantizing.
The image series filename can be set in the text box next to the Start button. The Start button begins the acquisition.